Authentication - 各类登录认证代码实现与整合

用户名密码认证

主要逻辑及时序图

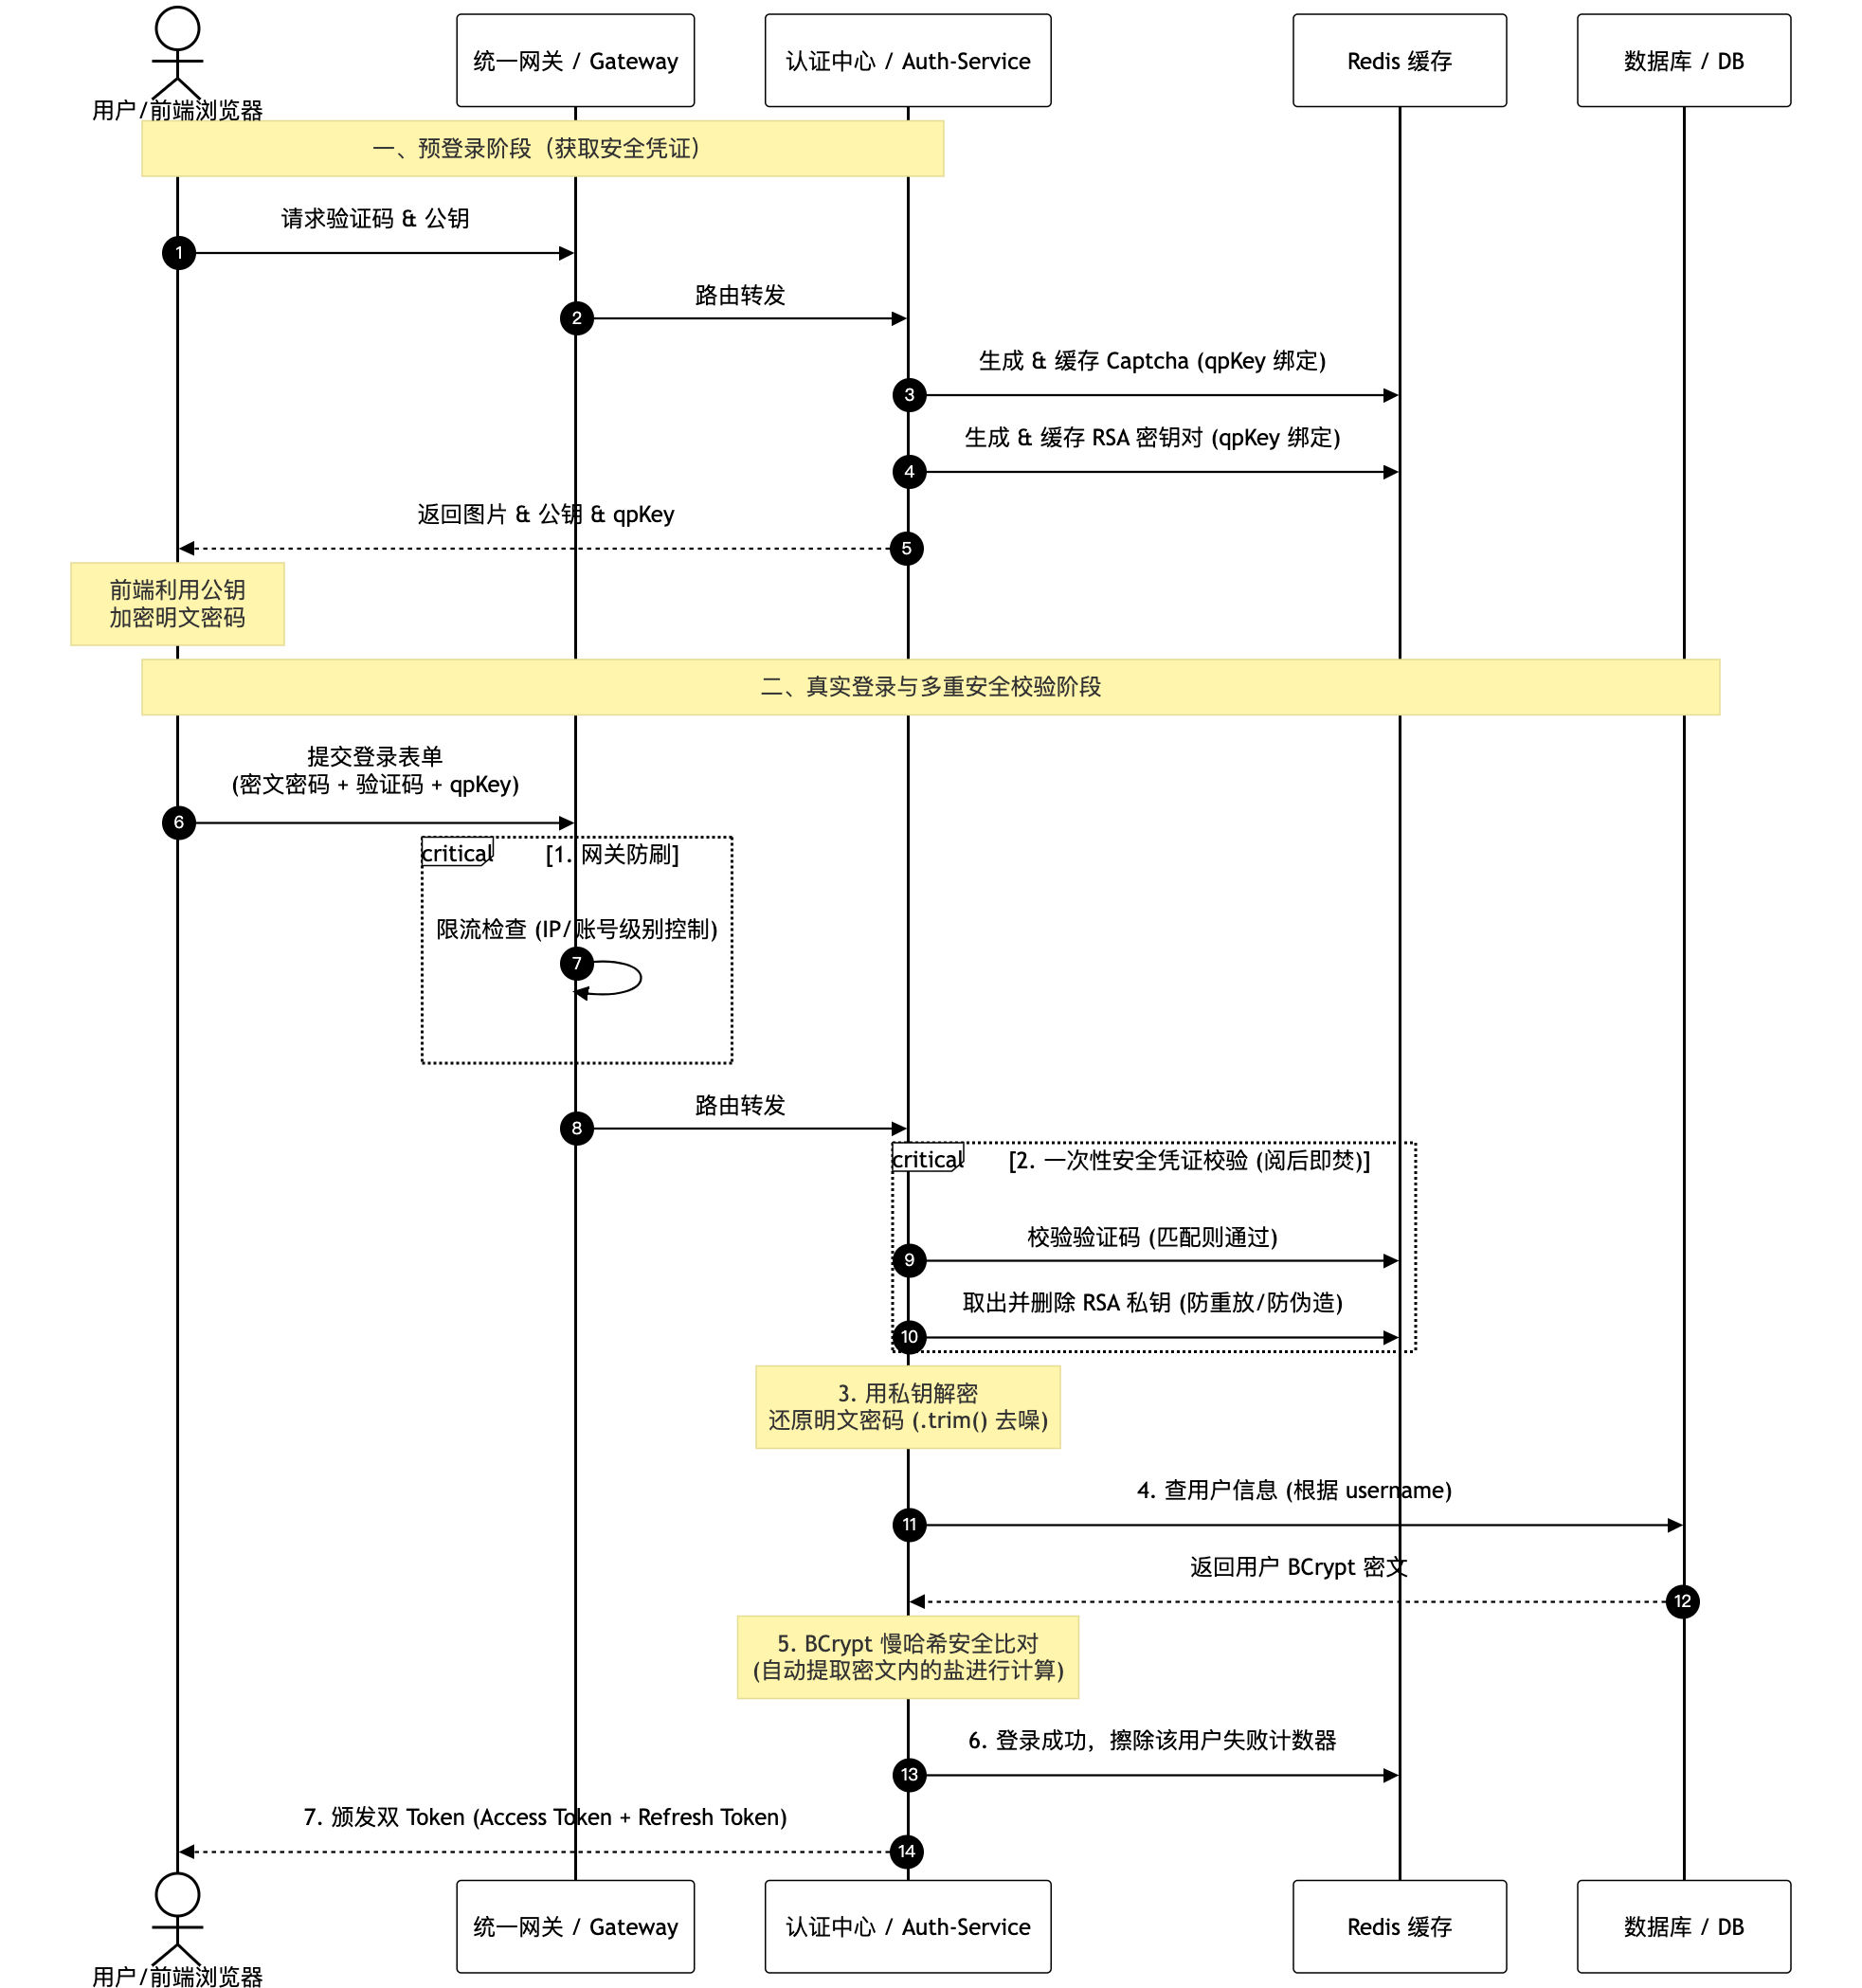
前后端分离架构下,基于 Token(JWT)认证的用户名密码登录核心逻辑可以概括为 “两次请求,三重防护,阅后即焚,无状态颁发”。

  • 阶段一:预登录(安全铺垫)。前端先向后端发起请求。后端生成一个唯一凭证 qpKey,并以此为键,将图形验证码和动态生成的 RSA 私钥存入 Redis 缓存;随后将验证码图片、RSA 公钥及 qpKey(quick public key) 返回给前端。
  • 阶段二:前端加密与提交。用户输入账号密码并填写验证码。前端利用拿到的 RSA 公钥将明文密码加密成密文,连同验证码、qpKey 一并打包提交给后端。
  • 阶段三:后端多重校验与解密(阅后即焚)
    • 网关/频率限制:首先通过 Redis 计数器进行接口限流或错误次数检查,防止暴力破解。
    • 验证码比对:根据 qpKey 从 Redis 捞出验证码进行一致性校验。
    • 私钥解密(核心防御):根据 qpKey 捞出 RSA 私钥解密密码,无论对错立刻从 Redis 中删除该私钥与验证码,实现凭证 “阅后即焚”,彻底封杀重放攻击。
  • 阶段四:数据库验证与 Token 颁发(无状态)。后端从库中捞出用户信息,查询该用户的 60 位 BCrypt 密文密码。利用 passwordEncoder.matches() 将还原的明文与数据库密文进行慢哈希比对。验证通过后,服务器不再开辟 Session,而是直接签发无状态的 双 Token(Access Token + Refresh Token)返回给前端,至此天生免疫 CSRF 攻击。

代码实现

依赖配置

1
2
3
4
5
6
7
8
9
10
11
12
13
14
15
16
17
18
19
20
21
22
23
24
25
26
27
28
29
30
31
32
33
34
35
36
37
38
39
40
41
42
43
44
45
46
47
48
49
50
51
52
53
54
55
56
57
58
59
60
<dependencies>
<!-- Spring Boot Web -->
<dependency>
<groupId>org.springframework.boot</groupId>
<artifactId>spring-boot-starter-web</artifactId>
<version>3.3.0</version>
</dependency>
<!-- 用于引入 BCrypt 慢哈希加密器 -->
<dependency>
<groupId>org.springframework.boot</groupId>
<artifactId>spring-boot-starter-security</artifactId>
<version>3.3.0</version>
</dependency>
<!-- 用于快速生成高质量图形验证码 -->
<dependency>
<groupId>cn.hutool</groupId>
<artifactId>hutool-all</artifactId>
<version>5.8.34</version>
</dependency>

<!-- JJWT -->
<dependency>
<groupId>io.jsonwebtoken</groupId>
<artifactId>jjwt-api</artifactId>
<version>0.12.7</version>
</dependency>
<dependency>
<groupId>io.jsonwebtoken</groupId>
<artifactId>jjwt-impl</artifactId>
<version>0.12.7</version>
<scope>runtime</scope>
</dependency>
<dependency>
<groupId>io.jsonwebtoken</groupId>
<artifactId>jjwt-jackson</artifactId>
<version>0.12.7</version>
<scope>runtime</scope>
</dependency>

<!-- Redis -->
<dependency>
<groupId>org.springframework.boot</groupId>
<artifactId>spring-boot-starter-data-redis</artifactId>
<version>3.3.0</version>
</dependency>

<!-- Spring Data JDBC -->
<dependency>
<groupId>org.springframework.boot</groupId>
<artifactId>spring-boot-starter-data-jdbc</artifactId>
<version>3.3.0</version>
</dependency>
<!-- MySQL 数据库驱动 -->
<dependency>
<groupId>com.mysql</groupId>
<artifactId>mysql-connector-j</artifactId>
<version>8.3.0</version>
<scope>runtime</scope>
</dependency>
</dependencies>


配置文件

aplication.yml

1
2
3
4
5
6
7
8
9
10
11
12
13
server:
port: 8080

spring:
datasource:
url: jdbc:mysql://192.168.1.251:3306/xxx_db?useUnicode=true&characterEncoding=utf-8&useSSL=false&serverTimezone=Asia/Shanghai
username: xxx
password: xxx
driver-class-name: com.mysql.cj.jdbc.Driver
data:
redis:
host: localhost
port: 6379


建表语句

1
2
3
4
5
6
7
8
9
10
11
12
CREATE TABLE `sys_user`
(
`id` bigint(20) NOT NULL AUTO_INCREMENT COMMENT '主键ID',
`username` varchar(50) NOT NULL COMMENT '用户名',
`password` varchar(100) NOT NULL COMMENT 'BCrypt加密后的密码密文',
PRIMARY KEY (`id`),
UNIQUE KEY `uk_username` (`username`)
) ENGINE = InnoDB
DEFAULT CHARSET = utf8mb4;

INSERT INTO `sys_user` (`username`, `password`)
VALUES ('admin', '$2a$10$vI8aWBnW3fID.A4gebMcu.thG840O4AnWqIdtUVOnfA5WJNCwWcKu');


启动类

1
2
3
4
5
6
7
8
9
10
11
import org.springframework.boot.SpringApplication;
import org.springframework.boot.autoconfigure.SpringBootApplication;
import org.springframework.data.jdbc.repository.config.EnableJdbcRepositories;

@SpringBootApplication
@EnableJdbcRepositories
public class App {
public static void main(String[] args) {
SpringApplication.run(App.class, args);
}
}


配置类和jwt过滤器

SecurityConfig

1
2
3
4
5
6
7
8
9
10
11
12
13
14
15
16
17
18
19
20
21
22
23
24
25
26
27
28
29
30
31
32
33
34
35
36
37
38
39
40
41
42
43
44
45
46
47
48
49
50
51
52
53
54
55
56
57
58
59
60
61
62
63
64
65
66
67
import org.springframework.context.annotation.Bean;
import org.springframework.context.annotation.Configuration;
import org.springframework.security.config.annotation.web.builders.HttpSecurity;
import org.springframework.security.config.annotation.web.configurers.AbstractHttpConfigurer;
import org.springframework.security.config.http.SessionCreationPolicy;
import org.springframework.security.crypto.bcrypt.BCryptPasswordEncoder;
import org.springframework.security.crypto.password.PasswordEncoder;
import org.springframework.security.web.SecurityFilterChain;
import org.springframework.security.web.authentication.UsernamePasswordAuthenticationFilter;
import zdemo01.filter.JwtAuthenticationFilter;

@Configuration
public class SecurityConfig {

@Bean
public PasswordEncoder passwordEncoder() {
return new BCryptPasswordEncoder();
}

@Bean
public SecurityFilterChain securityFilterChain(HttpSecurity http, JwtAuthenticationFilter jwtAuthenticationFilter) throws Exception {
http
// 1. 禁用 CSRF(因为用 Token 认证天生免疫 CSRF)
.csrf(AbstractHttpConfigurer::disable)
// 2. 开启跨域允许(Vary: Origin 说明你有跨域诉求)
.cors(cors -> cors.configure(http))
// 明确禁用表单登录(防止自动配置介入)
.formLogin(AbstractHttpConfigurer::disable)
// 明确禁用 HTTP Basic(防止打日志)
.httpBasic(AbstractHttpConfigurer::disable)
// 无状态会话,服务端不保存任何主体状态
.sessionManagement(session -> session.sessionCreationPolicy(SessionCreationPolicy.STATELESS))
// 授权规则
.authorizeHttpRequests(auth -> auth
.requestMatchers("/api/auth/**").permitAll() // 放行登录、预登录
.requestMatchers("/api/authEmail/**").permitAll() // 放行登录、预登录
.anyRequest().authenticated() // 其他请求都需要认证
)
// 👇 将 JWT 校验过滤器置于 UsernamePasswordAuthenticationFilter 之前
.addFilterBefore(jwtAuthenticationFilter, UsernamePasswordAuthenticationFilter.class);
return http.build();
}

/**
* 以前有状态的流程(需要 UserDetailsService)
* 1. 前端提交用户名密码
* 2. Spring Security 把 token 交给 DaoAuthenticationProvider
* 3. Provider 内部调用了你写的 UserDetailsService
* 4. 拿出数据库的密码,和前端提交的 123456 比对
* 5. 比对成功,才把用户标记为已认证
*
*
* 本项目采用纯 JWT 无状态认证(见 JwtAuthenticationFilter),
* 请求在到达 Controller 之前已由自定义 Filter 完成 Token 校验并写入 SecurityContext,
* 不走 Spring Security 原生的表单/Dao 认证流程。因此无需配置 UserDetailsService,禁用 formLogin/basic 即可避免默认用户日志。
*/
/*@Bean
public UserDetailsService userDetailsService(UserRepository userRepository) { // 内部注入你的数据库仓库
return username -> userRepository.findByUsername(username)
.map(u -> User.withUsername(u.getUsername())
.password(u.getPassword()) // 这里的密码已经是数据库里的 BCrypt 密文了
.authorities("ADMIN") // 给个默认权限
.build()
)
.orElseThrow(() -> new UsernameNotFoundException("用户不存在: " + username));
}*/
}

JwtAuthenticationFilter

1
2
3
4
5
6
7
8
9
10
11
12
13
14
15
16
17
18
19
20
21
22
23
24
25
26
27
28
29
30
31
32
33
34
35
36
37
38
39
40
41
42
43
44
45
46
47
48
49
50
51
52
53
import io.jsonwebtoken.Claims;
import jakarta.servlet.FilterChain;
import jakarta.servlet.ServletException;
import jakarta.servlet.http.HttpServletRequest;
import jakarta.servlet.http.HttpServletResponse;
import org.springframework.security.authentication.UsernamePasswordAuthenticationToken;
import org.springframework.security.core.context.SecurityContextHolder;
import org.springframework.stereotype.Component;
import org.springframework.web.filter.OncePerRequestFilter;
import zdemo01.utils.JwtUtil;
import java.io.IOException;
import java.util.Collections;
import java.util.Map;

@Component
public class JwtAuthenticationFilter extends OncePerRequestFilter {

@Override
protected void doFilterInternal(HttpServletRequest request, HttpServletResponse response, FilterChain filterChain)
throws ServletException, IOException {

// 放过浏览器预检请求,避免跨域 403
if ("OPTIONS".equalsIgnoreCase(request.getMethod())) {
filterChain.doFilter(request, response);
return;
}

String header = request.getHeader("Authorization");
if (header != null && header.startsWith("Bearer ")) {
String token = header.substring(7);
try {
// 解析之前生成的 JWT
Claims claims = JwtUtil.parseToken(token);
String userId = claims.getSubject();
String username = claims.get("username", String.class);
// 将用户信息存入 Security 上下文(这里不需要查库,无状态),认证成功之后凭据就被擦除,角色由于是测试先给个空
UsernamePasswordAuthenticationToken auth = new UsernamePasswordAuthenticationToken(
Map.of("userId", userId, "username", username),
null,
Collections.emptyList()
);
// SecurityContextHolder 是一个线程级别的全局储物柜(基于 ThreadLocal),setAuthentication(auth),就相当于在这个请求的处理线程里挂了一个“已认证”的牌子。
// 后面 SecurityFilterChain 里的 .anyRequest().authenticated() 检查时,一看线程里有 Authentication 且 isAuthenticated() == true 就放行。
SecurityContextHolder.getContext().setAuthentication(auth);
} catch (Exception e) {
// Token 过期/篡改,清空上下文
SecurityContextHolder.clearContext();
}
}
// 无论是否带 Token,都放行给后面的逻辑(没认证后面 .authenticated() 自然会拦截)
filterChain.doFilter(request, response);
}
}


认证业务类

AuthController

1
2
3
4
5
6
7
8
9
10
11
12
13
14
15
16
17
18
19
20
21
22
23
24
25
26
27
28
29
30
31
32
33
34
35
36
37
38
39
40
41
42
43
44
45
46
47
48
49
50
51
52
53
54
55
56
57
58
59
60
61
62
63
64
65
66
67
68
69
70
71
72
73
74
75
76
77
78
79
80
81
82
83
84
85
86
87
88
89
90
91
92
93
94
95
96
97
98
99
100
101
102
103
104
105
106
107
108
109
110
111
112
113
114
115
116
117
118
119
120
121
122
123
124
125
126
127
128
129
130
131
132
133
134
135
136
137
138
139
140
141
import cn.hutool.captcha.CaptchaUtil;
import cn.hutool.captcha.LineCaptcha;
import jakarta.annotation.Resource;
import org.springframework.data.redis.core.StringRedisTemplate;
import org.springframework.http.HttpStatus;
import org.springframework.http.ResponseEntity;
import org.springframework.security.crypto.password.PasswordEncoder;
import org.springframework.web.bind.annotation.*;
import zdemo01.model.LoginDTO;
import zdemo01.model.entity.UserEntity;
import zdemo01.repository.UserRepository;
import zdemo01.utils.JwtUtil;
import zdemo01.utils.RsaUtil;
import java.util.HashMap;
import java.util.Map;
import java.util.Optional;
import java.util.UUID;
import java.util.concurrent.TimeUnit;

@RestController
@RequestMapping("/api/auth")
public class AuthController {

@Resource
private StringRedisTemplate stringRedisTemplate;
@Resource
private PasswordEncoder passwordEncoder;
@Resource
private UserRepository userRepository;

private static final String REDIS_CAPTCHA_PREFIX = "auth:captcha:";
private static final String REDIS_RSA_PRIVATE_PREFIX = "auth:rsa:private:";
private static final String REDIS_FAIL_COUNT_PREFIX = "auth:fail:count:";

/**
* 1. 预登录接口(生成公钥、验证码)
*/
@GetMapping("/pre-login")
public ResponseEntity<?> preLogin() {
try {
String qpKey = UUID.randomUUID().toString().replaceAll("-", "");
LineCaptcha captcha = CaptchaUtil.createLineCaptcha(200, 100, 4, 20);
Map<String, String> keyPair = RsaUtil.generateKeyPair();

stringRedisTemplate.opsForValue().set(REDIS_CAPTCHA_PREFIX + qpKey, captcha.getCode().toLowerCase(), 3, TimeUnit.MINUTES);
stringRedisTemplate.opsForValue().set(REDIS_RSA_PRIVATE_PREFIX + qpKey, keyPair.get("privateKey"), 3, TimeUnit.MINUTES);

Map<String, Object> responseData = new HashMap<>();
responseData.put("qpKey", qpKey);
responseData.put("publicKey", keyPair.get("publicKey"));
responseData.put("captchaImage", captcha.getImageBase64Data());

return ResponseEntity.ok(responseData);
} catch (Exception e) {
return ResponseEntity.status(HttpStatus.INTERNAL_SERVER_ERROR).body("凭证生成失败");
}
}

/**
* 2. 登录认证接口(用户名/密码)
*/
@PostMapping("/login")
public ResponseEntity<?> login(@RequestBody LoginDTO loginDTO) {
String qpKey = loginDTO.getQpKey();
String username = loginDTO.getUsername();

// 1. 限流防爆破
String failCountKey = REDIS_FAIL_COUNT_PREFIX + username;
String failCountStr = stringRedisTemplate.opsForValue().get(failCountKey);
if (failCountStr != null && Integer.parseInt(failCountStr) >= 5) {
return ResponseEntity.status(HttpStatus.TOO_MANY_REQUESTS).body("错误次数过多,请15分钟后再试");
}

// 2. 校验图形验证码
String cachedCaptcha = stringRedisTemplate.opsForValue().get(REDIS_CAPTCHA_PREFIX + qpKey);
if (cachedCaptcha == null || !cachedCaptcha.equals(loginDTO.getCaptchaCode().toLowerCase())) {
return ResponseEntity.status(HttpStatus.BAD_REQUEST).body("验证码错误或已过期");
}

// 3. 提取私钥解密密码
String privateKeyKey = REDIS_RSA_PRIVATE_PREFIX + qpKey;
String privateKey = stringRedisTemplate.opsForValue().get(privateKeyKey);
if (privateKey == null) {
return ResponseEntity.status(HttpStatus.BAD_REQUEST).body("安全凭证已失效");
}

String rawPassword;
try {
rawPassword = RsaUtil.decrypt(loginDTO.getEncryptedPassword(), privateKey);
} catch (Exception e) {
return ResponseEntity.status(HttpStatus.BAD_REQUEST).body("数据解析失败");
} finally {
// 阅后即焚:只要提交,无论对错立刻蒸发私钥与验证码,让 CSRF/重放攻击无从下手
stringRedisTemplate.delete(privateKeyKey);
stringRedisTemplate.delete(REDIS_CAPTCHA_PREFIX + qpKey);
}

// 从库中捞出用户信息
Optional<UserEntity> userOpt = userRepository.findByUsername(username);
// BCrypt 比对(直接用从 DB 查出来的密文进行 matches)
if (userOpt.isEmpty() || !passwordEncoder.matches(rawPassword, userOpt.get().getPassword())) {
Long currentFailCount = stringRedisTemplate.opsForValue().increment(failCountKey);
if (currentFailCount != null && currentFailCount == 1) {
stringRedisTemplate.expire(failCountKey, 15, TimeUnit.MINUTES);
}
return ResponseEntity.status(HttpStatus.UNAUTHORIZED).body("用户名或密码错误");
}

// 5. 成功通关:擦除失败计数,并签发无状态 Token 令牌
stringRedisTemplate.delete(failCountKey);

// 抛弃 Session 机制,在此处签发 JWT 令牌
UserEntity user = userOpt.get();
String accessToken = JwtUtil.generateToken(user.getId().toString(), user.getUsername());

Map<String, Object> successData = new HashMap<>();
successData.put("token", accessToken); // 将 Token 交给前端处理
successData.put("tokenType", "Bearer");
successData.put("username", user.getUsername());
return ResponseEntity.ok(successData);
}

/**
* 3. 用户注册接口。演示如何在数据落库前,使用 BCrypt 自动加盐加密
*/
@PostMapping("/register")
public ResponseEntity<?> register(@RequestParam String username, @RequestParam String password) {
// 检查用户名是否已存在
if (userRepository.findByUsername(username).isPresent()) {
return ResponseEntity.status(HttpStatus.BAD_REQUEST).body("用户名已被占用");
}

// 使用 BCrypt 加密明文密码,得到合法的 60 位密文(内部自带随机盐)
String encodedPassword = passwordEncoder.encode(password);

// 构造实体并持久化
UserEntity newUser = new UserEntity(null, username, encodedPassword);
userRepository.save(newUser);
return ResponseEntity.ok("注册成功");
}
}

UserRepository

1
2
3
4
5
6
7
8
@Repository
public interface UserRepository extends CrudRepository<UserEntity, Long> {

/**
* 根据用户名查找用户
*/
Optional<UserEntity> findByUsername(String username);
}

UserEntity

1
2
3
4
5
6
7
8
9
10
@Table("sys_user")
@Data
@AllArgsConstructor
@NoArgsConstructor
public class UserEntity {
@Id
private Long id;
private String username;
private String password;
}

LoginDTO

1
2
3
4
5
6
7
8
9
10
11
@Data
public class LoginDTO {
// 用户名
private String username;
// 经过前端 RSA 公钥加密后的密码密文(传输过程中防止明文泄露)
private String encryptedPassword;
// 图形验证码文本
private String captchaCode;
// 预登录唯一凭证 Key(用于从 Redis 中检索对应的验证码和解密私钥)
private String qpKey;
}


工具类

RsaUtil

1
2
3
4
5
6
7
8
9
10
11
12
13
14
15
16
17
18
19
20
21
22
23
24
25
26
27
28
29
30
31
32
33
34
35
36
37
38
39
40
41
42
43
44
45
46
47
48
49
50
51
52
53
54
55
56
57
58
import javax.crypto.Cipher;
import java.security.*;
import java.security.spec.PKCS8EncodedKeySpec;
import java.security.spec.X509EncodedKeySpec;
import java.util.Base64;
import java.util.HashMap;
import java.util.Map;

public class RsaUtil {
private static final String ALGORITHM = "RSA";

public static Map<String, String> generateKeyPair() throws NoSuchAlgorithmException {
KeyPairGenerator keyPairGen = KeyPairGenerator.getInstance(ALGORITHM);
keyPairGen.initialize(2048); // 2048位安全强度
KeyPair keyPair = keyPairGen.generateKeyPair();

Map<String, String> keyMap = new HashMap<>();
keyMap.put("publicKey", Base64.getEncoder().encodeToString(keyPair.getPublic().getEncoded()));
keyMap.put("privateKey", Base64.getEncoder().encodeToString(keyPair.getPrivate().getEncoded()));
return keyMap;
}

public static String decrypt(String encryptedText, String privateKeyBase64) throws Exception {
byte[] keyBytes = Base64.getDecoder().decode(privateKeyBase64);
PKCS8EncodedKeySpec pkcs8KeySpec = new PKCS8EncodedKeySpec(keyBytes);
KeyFactory keyFactory = KeyFactory.getInstance(ALGORITHM);
PrivateKey privateKey = keyFactory.generatePrivate(pkcs8KeySpec);

// 兼容前端标准的 JSEncrypt 库填充模式
Cipher cipher = Cipher.getInstance("RSA/ECB/PKCS1Padding");
cipher.init(Cipher.DECRYPT_MODE, privateKey);
return new String(cipher.doFinal(Base64.getDecoder().decode(encryptedText)), "UTF-8");
}

public static String encrypt(String plainText, String publicKeyBase64) throws Exception {
// 1. 将 Base64 编码的公钥字符串解码并还原为 PublicKey 对象
byte[] keyBytes = Base64.getDecoder().decode(publicKeyBase64);
X509EncodedKeySpec x509KeySpec = new X509EncodedKeySpec(keyBytes);
KeyFactory keyFactory = KeyFactory.getInstance(ALGORITHM);
PublicKey publicKey = keyFactory.generatePublic(x509KeySpec);

// 2. 初始化 Cipher,必须与解密端保持完全一致的算法和填充模式
Cipher cipher = Cipher.getInstance("RSA/ECB/PKCS1Padding");
cipher.init(Cipher.ENCRYPT_MODE, publicKey);

// 3. 执行加密并将其转换为 Base64 字符串返回
byte[] encryptedBytes = cipher.doFinal(plainText.getBytes("UTF-8"));
return Base64.getEncoder().encodeToString(encryptedBytes);
}


/*public static void main(String[] args) throws Exception {
String plainText = "123456";
String publicKeyBase64 = "MIIBIjANBgkqxx...fF5tVq4BCxaKOTwIDAQAB";
String encrypt = encrypt(plainText, publicKeyBase64); // 前端使用公钥对密码加密传到后端
System.out.println(encrypt);
}*/
}

JwtUtil

1
2
3
4
5
6
7
8
9
10
11
12
13
14
15
16
17
18
19
20
21
22
23
24
25
26
27
28
29
30
31
32
33
34
35
36
37
38
39
import io.jsonwebtoken.Claims;
import io.jsonwebtoken.Jwts;
import io.jsonwebtoken.security.Keys;
import javax.crypto.SecretKey;
import java.nio.charset.StandardCharsets;
import java.util.Date;

public class JwtUtil {

// Token 有效期:2 小时
private static final long EXPIRATION_TIME = 2 * 60 * 60 * 1000;
private static final SecretKey SECRET_KEY = Keys.hmacShaKeyFor("SecureInternalWatermarkKeyStandardLength32Bytes!".getBytes(StandardCharsets.UTF_8));

/**
* 签发 Token
*/
public static String generateToken(String userId, String username) {
long now = System.currentTimeMillis();
return Jwts.builder()
.subject(userId)
.claim("userId", userId)
.claim("username", username)
.issuedAt(new Date(now))
.expiration(new Date(now + EXPIRATION_TIME))
.signWith(SECRET_KEY)
.compact();
}

/**
* 解析与验签 Token
*/
public Claims parseToken(String token) {
return Jwts.parser()
.verifyWith(SECRET_KEY)
.build()
.parseSignedClaims(token)
.getPayload();
}
}


测试验证

1
2
3
4
5
6
7
8
9
10
11
12
13
14
15
16
17
18
19
20
# 1
POST http://localhost:8080/api/auth/register?username=admin&password=123456

# 2
GET http://localhost:8080/api/auth/pre-login

# 3
POST http://localhost:8080/api/auth/login
Content-Type: application/json

{
"username": "admin",
"encryptedPassword": "xxxSzWRThPcQ==",
"captchaCode": "aqq1",
"qpKey": "0d2a342ca30e4f4ba6aa5e155846b068"
}

# 4
GET http://localhost:8080/api/order/getOrderById?orderId=1
Authorization: Bearer eyJhbGcxxx


手机验证码认证

主要逻辑和时序图

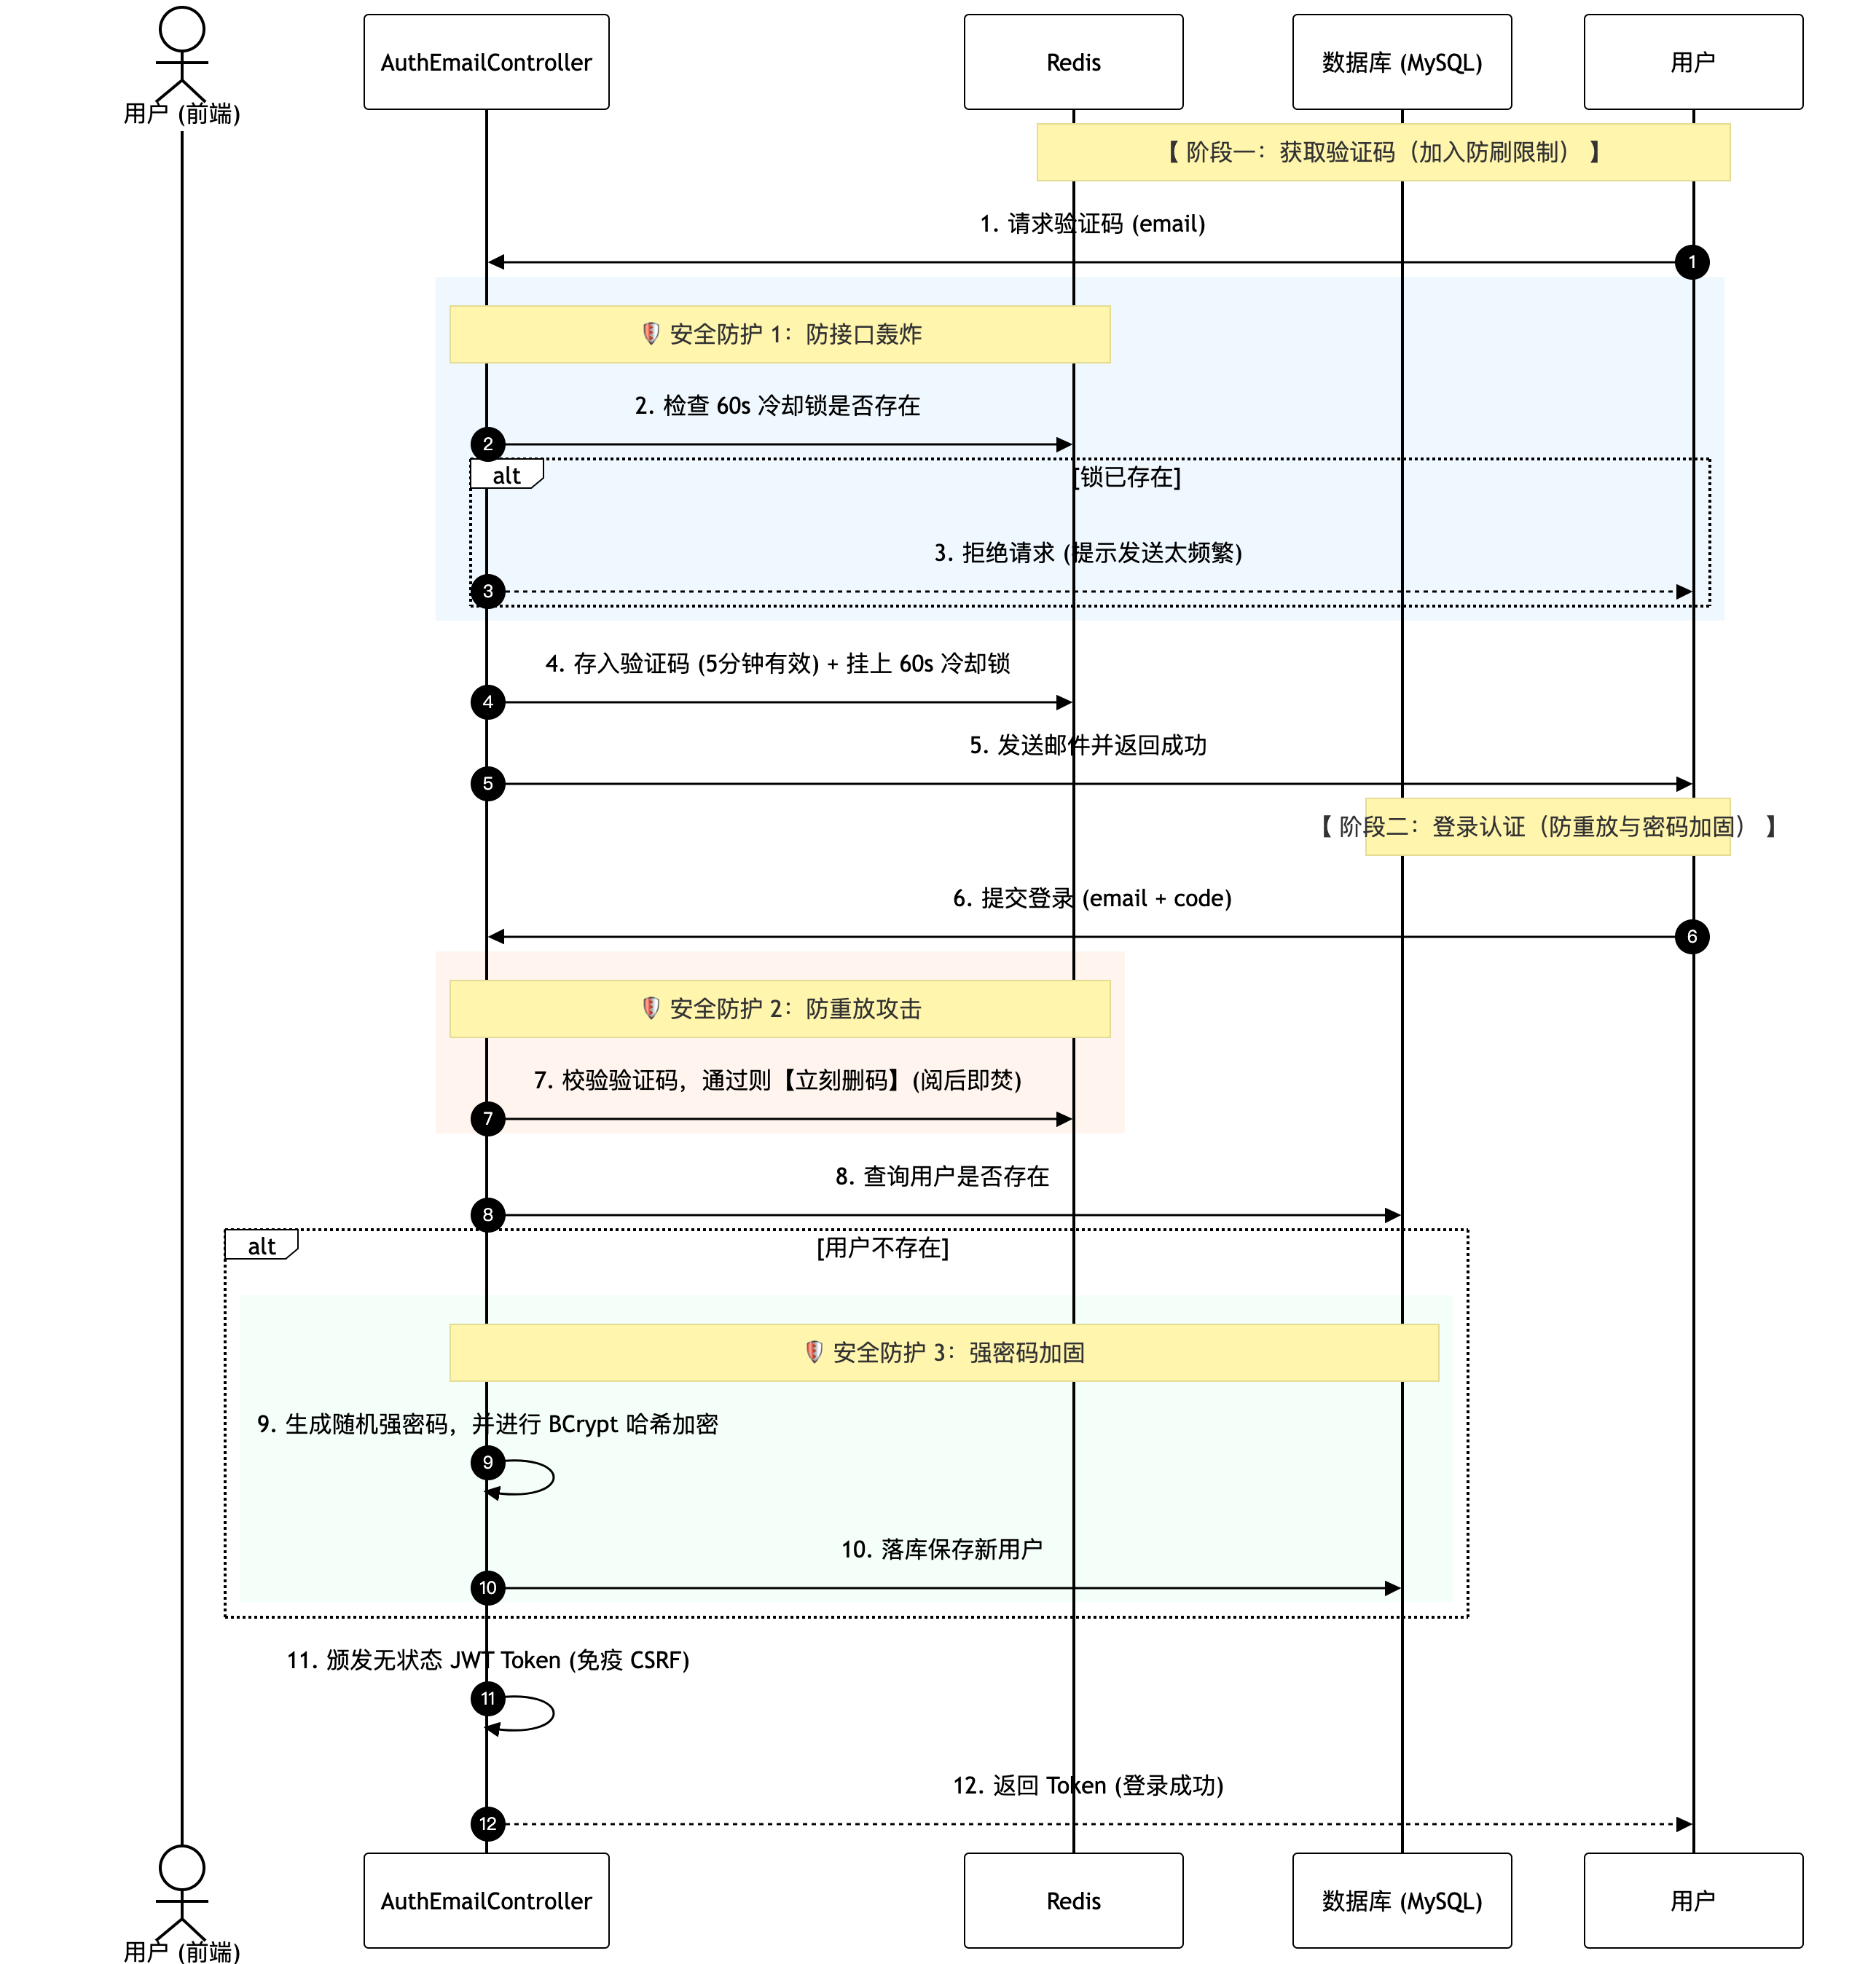
这里为了省钱和方便测试,索性就直接使用邮箱验证码代替手机验证码了。手机验证码认证的时序图如下:

代码实现

依赖配置

在上述基础上,增加依赖项:

1
2
3
4
5
<dependency>
<groupId>org.springframework.boot</groupId>
<artifactId>spring-boot-starter-mail</artifactId>
<version>3.3.0</version>
</dependency>


配置文件

在原来基础上增加email配置:

1
2
3
4
5
6
7
8
9
10
11
12
13
14
15
16
17
18
19
20
21
22
23
spring:
mail:
host: smtp.126.com
port: 465 # SMTP 端口(通常开启 TLS 使用 587 或 465)
username: xxx@126.com
password: XXXXX23XXXXXyyYx
properties:
mail:
smtp:
auth: true
starttls:
enable: true
required: true
ssl:
enable: true
# 网易 465 必须指定协议
protocols: TLSv1.2
# 关键:指定 SSL Socket 工厂,否则 465 会握手失败
socketFactory:
class: javax.net.ssl.SSLSocketFactory
fallback: false
# 调试开关,通了之后再关掉
debug: true


认证业务类

AuthEmailController

1
2
3
4
5
6
7
8
9
10
11
12
13
14
15
16
17
18
19
20
21
22
23
24
25
26
27
28
29
30
31
32
33
34
35
36
37
38
39
40
41
42
43
44
45
46
47
48
49
50
51
52
53
54
55
56
57
58
59
60
61
62
63
64
65
66
67
68
69
70
71
72
73
74
75
76
77
78
79
80
81
82
83
84
85
86
87
88
89
90
91
92
93
94
95
96
97
98
99
100
101
102
103
104
105
106
107
108
109
110
111
112
113
114
115
116
117
118
import jakarta.annotation.Resource;
import org.springframework.beans.factory.annotation.Value;
import org.springframework.data.redis.core.StringRedisTemplate;
import org.springframework.http.HttpStatus;
import org.springframework.http.ResponseEntity;
import org.springframework.mail.SimpleMailMessage;
import org.springframework.mail.javamail.JavaMailSender;
import org.springframework.security.crypto.password.PasswordEncoder;
import org.springframework.web.bind.annotation.*;
import zdemo01.model.LoginDTO;
import zdemo01.model.entity.UserEntity;
import zdemo01.repository.UserRepository;
import zdemo01.utils.JwtUtil;
import java.util.HashMap;
import java.util.Map;
import java.util.UUID;
import java.util.concurrent.TimeUnit;

@RestController
@RequestMapping("/api/authEmail")
public class AuthEmailController {

@Resource
private StringRedisTemplate stringRedisTemplate;
@Resource
private PasswordEncoder passwordEncoder;
@Resource
private UserRepository userRepository;

@Resource
private JavaMailSender javaMailSender;
@Value("${spring.mail.username}")
private String fromEmail;

private static final String REDIS_EMAIL_CODE_PREFIX = "auth:email:code:";
private static final String REDIS_SEND_LOCK_PREFIX = "auth:email:lock:";

/**
* 1. 预登录接口:发送验证码接口(模拟手机“获取验证码”)
* @param email 用户输入的邮箱账号
*/
@GetMapping("/pre-login")
public ResponseEntity<?> preLogin(@RequestParam String email) {
if (email == null || !email.contains("@")) {
return ResponseEntity.status(HttpStatus.BAD_REQUEST).body("请输入有效的邮箱地址");
}

// 防刷机制:同一个邮箱 60 秒内只能获取一次
String lockKey = REDIS_SEND_LOCK_PREFIX + email;
if (Boolean.TRUE.equals(stringRedisTemplate.hasKey(lockKey))) {
return ResponseEntity.status(HttpStatus.TOO_MANY_REQUESTS).body("发送太频繁,请稍后再试");
}

try {
// 生成 6 位纯数字随机验证码
String emailCode = String.valueOf((int) ((Math.random() * 9 + 1) * 100000));

// 存入 Redis,有效期 5 分钟
stringRedisTemplate.opsForValue().set(REDIS_EMAIL_CODE_PREFIX + email, emailCode, 5, TimeUnit.MINUTES);
// 设置 60 秒的发送冷却锁
stringRedisTemplate.opsForValue().set(lockKey, "lock", 60, TimeUnit.SECONDS);

// 发送模拟短信的邮件
SimpleMailMessage message = new SimpleMailMessage();
message.setFrom(fromEmail);
message.setTo(email);
message.setSubject("【Owlias】快捷登录验证码");
message.setText("您的快捷登录验证码为:" + emailCode + ",5分钟内有效。若非本人操作请忽略。");
javaMailSender.send(message);

return ResponseEntity.ok("验证码已发送,请注意查收");
} catch (Exception e) {
e.printStackTrace();
return ResponseEntity.status(HttpStatus.INTERNAL_SERVER_ERROR).body("验证码发送失败,请稍后重试");
}
}

/**
* 2. 登录认证接口(用户名/密码)
*/
@PostMapping("/login")
public ResponseEntity<?> login(@RequestBody LoginDTO loginDTO) {
String email = loginDTO.getUsername(); // 此时代表用户的邮箱
String code = loginDTO.getCaptchaCode(); // 此时代表用户的邮箱验证码

if (email == null || code == null) {
return ResponseEntity.status(HttpStatus.BAD_REQUEST).body("参数完整性校验失败");
}

// ① 验证码核心校验
String redisKey = REDIS_EMAIL_CODE_PREFIX + email;
String cachedCode = stringRedisTemplate.opsForValue().get(redisKey);
if (cachedCode == null || !cachedCode.equals(code)) {
return ResponseEntity.status(HttpStatus.BAD_REQUEST).body("验证码错误或已过期");
}
// 阅后即焚:验证成功立刻清除验证码,防止被黑客截获数据包进行重放攻击
stringRedisTemplate.delete(redisKey);
stringRedisTemplate.delete(REDIS_SEND_LOCK_PREFIX + email);

// ② 模拟免密的精髓:查库,找不到则 “首次登录即自动注册”
UserEntity user = userRepository.findByUsername(email)
.orElseGet(() -> {
String randomPasswordPlaceholder = UUID.randomUUID().toString().replaceAll("-", "");
String encodedPassword = passwordEncoder.encode(randomPasswordPlaceholder);
UserEntity newUser = new UserEntity(null, email, encodedPassword);
return userRepository.save(newUser);
});

// ③ 直接颁发无状态 JWT Token,天生免疫 CSRF
String accessToken = JwtUtil.generateToken(user.getId().toString(), user.getUsername());
Map<String, Object> successData = new HashMap<>();
successData.put("token", accessToken);
successData.put("tokenType", "Bearer");
successData.put("email", user.getUsername());
successData.put("msg", "登录成功");
return ResponseEntity.ok(successData);
}
}


测试验证

1
2
3
4
5
6
7
8
9
10
11
12
13
14
15
# 1
GET http://localhost:8080/api/authEmail/pre-login?email=kinglyjn@qq.com

# 2
POST http://localhost:8080/api/authEmail/login
Content-Type: application/json

{
"username": "xxx@xxx.com",
"captchaCode": "583357"
}

# 3
GET http://localhost:8080/api/order/getOrderById?orderId=1
Authorization: Bearer eyJhbGcxxx


手机扫码认证登录

主要逻辑和时序图

手机扫码登录(如微信扫码)的本质是:利用 “已经登录且具备安全认证的手机端(App)”,去帮 “处于未登录状态的网页端(PC)” 进行背书和授权。那么,如何证明扫码的人就是用户本人呢?核心就在于:手机端在扫码时,必须把手机本地缓存的、代表用户身份的 Token(凭证)与二维码的唯一标识(SceneKey/UUID)在后端进行绑定。
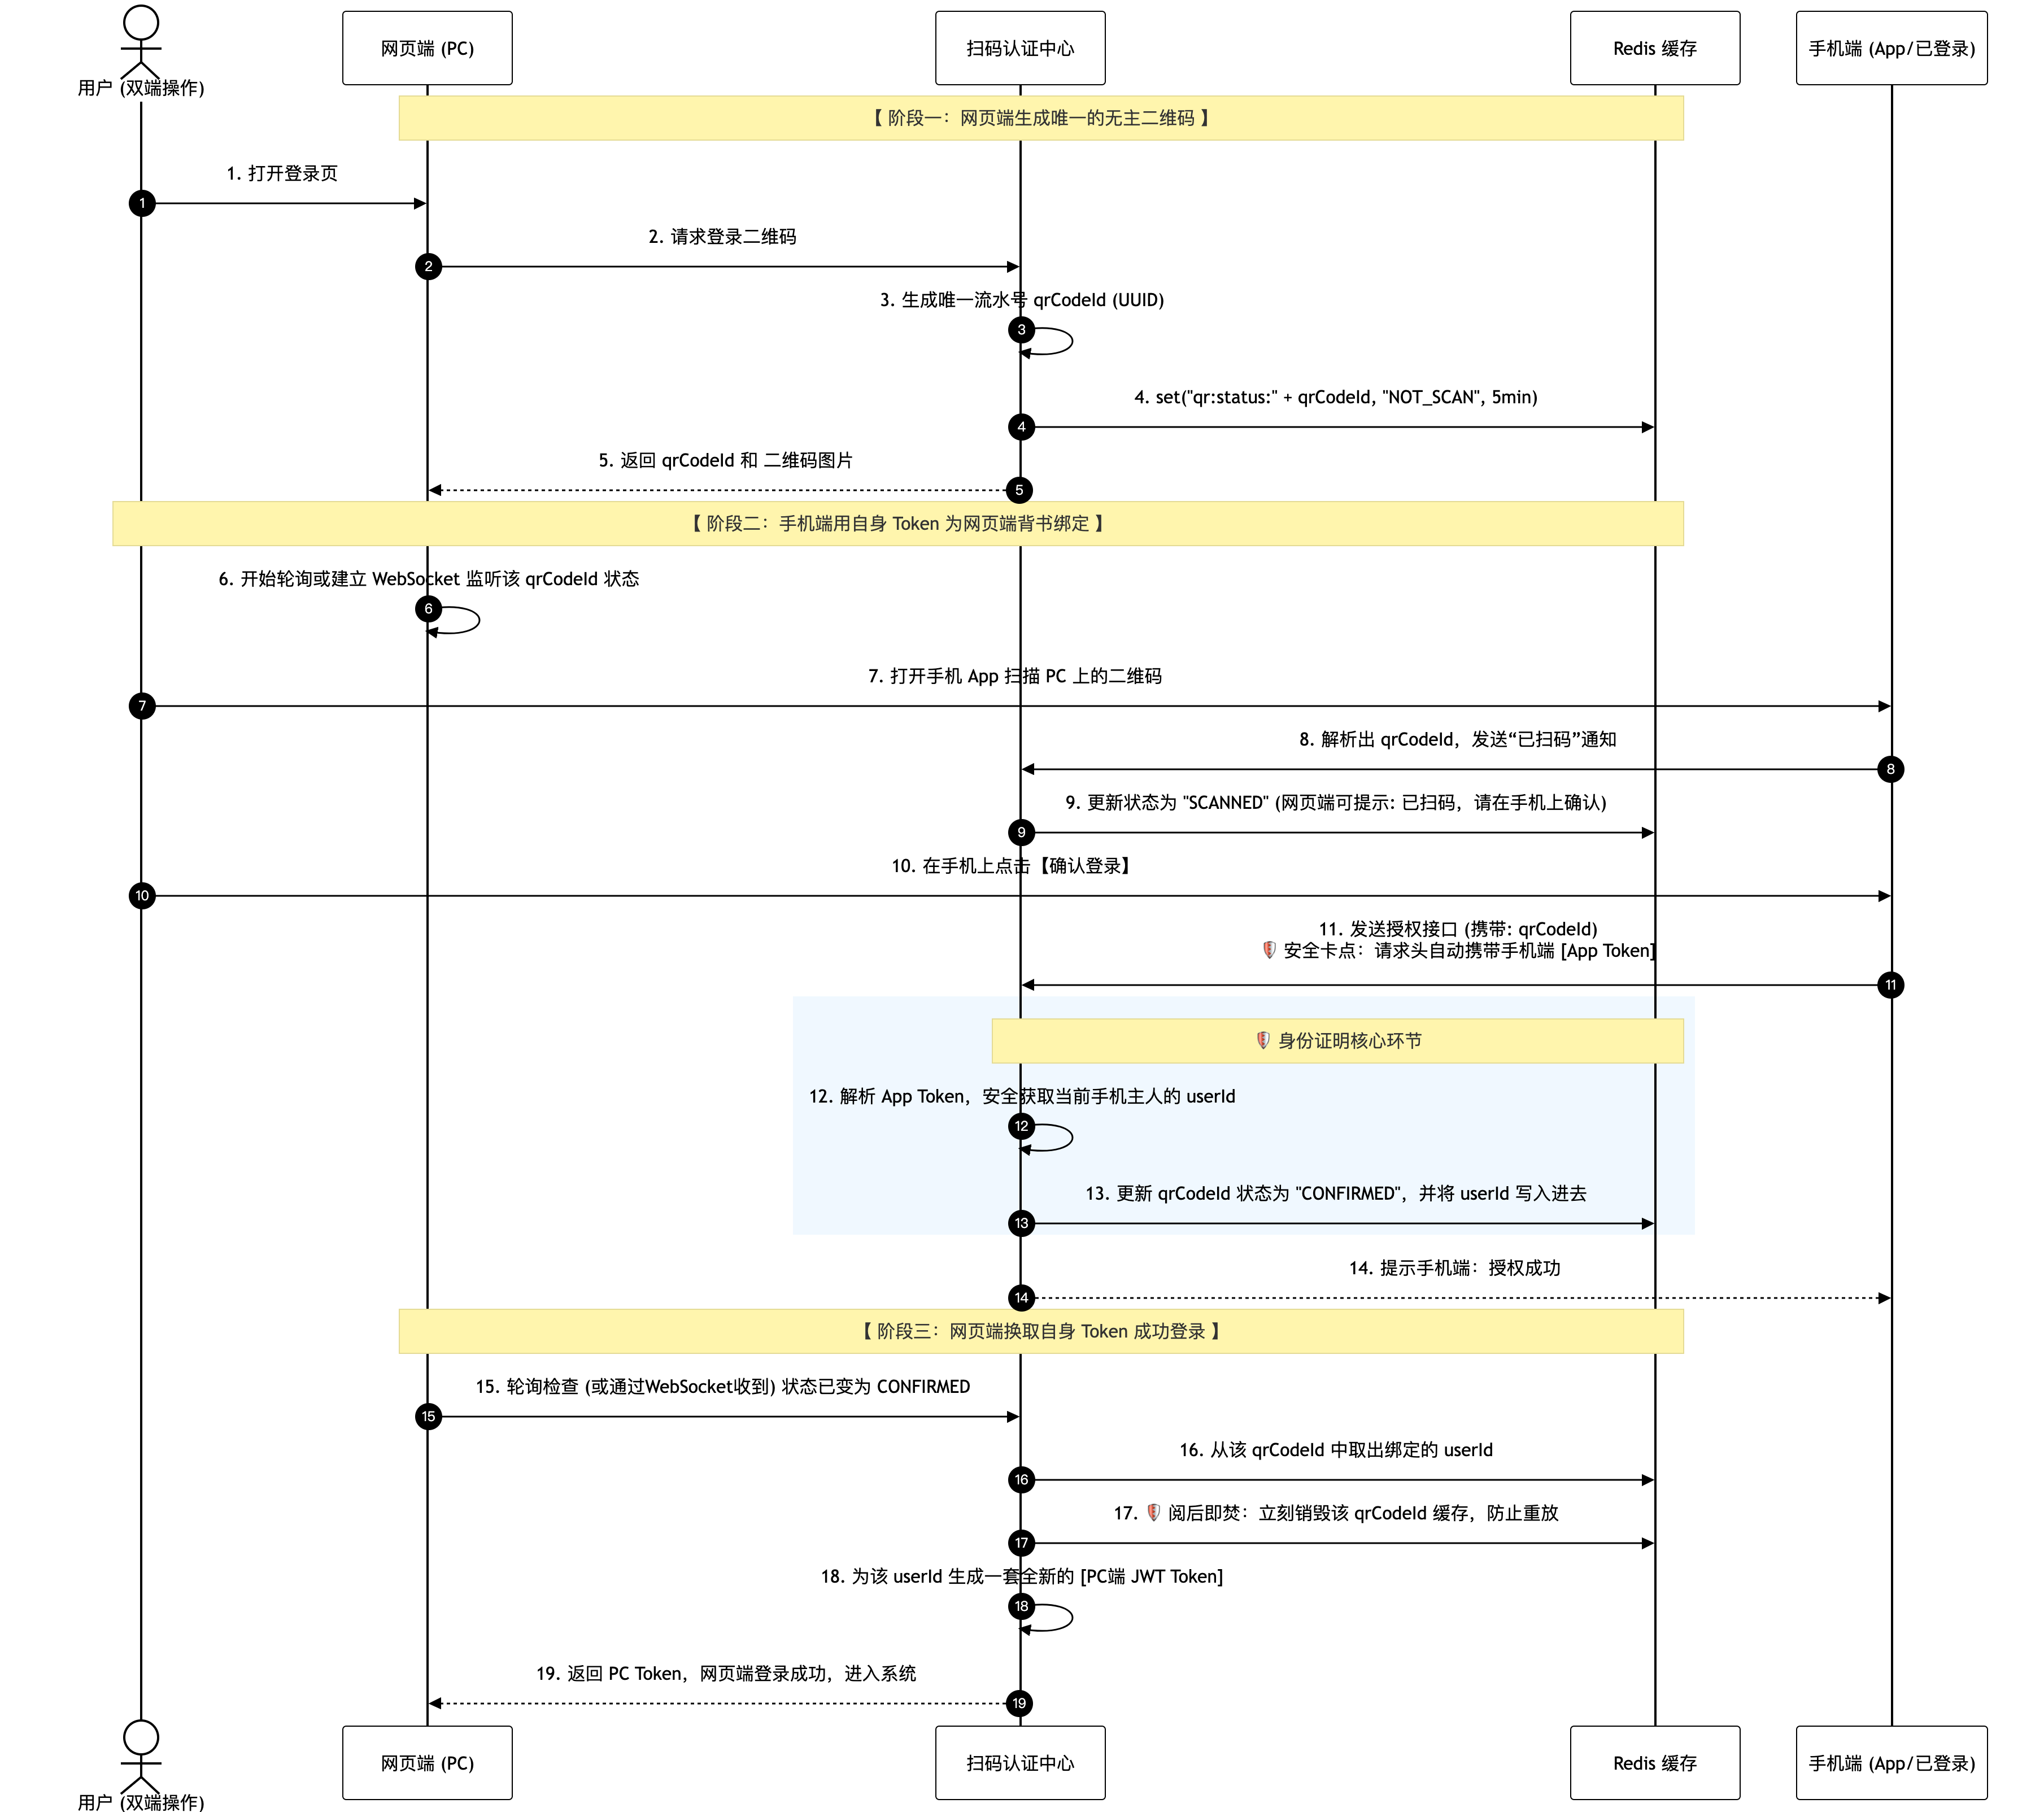
为了讲透这个逻辑,我们把整个扫码过程拆解为三个步骤,看看安全防线是如何层层递进的。

  • 网页端:生成 “带有数字签名” 的无主二维码。当用户打开 PC 端登录页时,网页端向后端请求一个二维码。
    • 后端会生成一个全球唯一的临时流水号 qrCodeId(通常是一个 UUID)。
    • 后端把这个 qrCodeId 存入 Redis,状态标记为 NOT_SCAN(未扫码),有效期一般为 2~5 分钟。
    • 证明的第一步:此时的二维码在全局是唯一的,它就像一个等待失主认领的广播箱。
  • 手机端:扫码并进行 “身份核验”。这一步是证明本人的最核心卡点。
    • 用户掏出手机,打开已经登录了账号的 App 或小程序去扫描这个二维码。
    • 当用户在手机上点击 “确认登录” 时,手机端会向后端发起一个授权请求,这个请求的 Headers 中必然自动携带了手机端本地的 Authorization: Bearer手机端TokenXxx,同时请求体里带着 qrCodeId。App 扫码后, 拿到的就是 qrCodeId。
    • 后端网关拦截到手机端的请求后,首先去解析手机端的 Token。因为这个 Token 是用户之前输入密码或指纹成功后颁发的,只要 Token 没过期、没被篡改,后端就能 100% 确认当前发送请求的手机主人是谁(获取到了 userId)。
  • 后端:绑定双端凭证(身份转移)
    • 后端在确认了手机端用户的 userId 后,立刻去 Redis 里找到对应的 qrCodeId,执行绑定:将 Redis 中该 qrCodeId 的状态修改为 CONFIRMED(已确认授权),将该 qrCodeId 的 Value 绑定上刚刚解析出来的 userId。
    • 此时,PC 端的那个 “无主二维码”,就正式和手机端的 “特定用户” 绑定在了一起。PC 端轮询(或通过 WebSocket 监听到)状态变成 CONFIRMED 后,后端直接根据绑定的 userId 为 PC 端签发属于 PC 端的 JWT Token。

如果我们要把这个方案推向生产,只靠上面的逻辑还不够,还必须加上以下三道防线:

  • 防跨时空重放:二维码的 qrCodeId 必须具备短暂的有效期(如 2 分钟)。一旦过期,Redis 直接销毁。如果黑客打印了你的二维码去骗别人扫,只要超过 2 分钟就会彻底失效。
  • 防调包攻击(二次确认):当手机 App 扫描成功后,App 界面上必须展示出必要的信息(例如:“您正在登录北京时间的 Mac 端浏览器,若非本人操作请拒绝”)。通过这种视觉确认,防止用户在不知情的情况下帮黑客的网页授权。
  • 一次性票据与阅后即焚:网页端在监听到状态为 CONFIRMED 成功拿到 PC Token 的那一瞬间,后端必须立刻从 Redis 中把这个 qrCodeId 删掉。确保这个二维码这辈子只能被成功登录一次,彻底封杀任何抓包复用的可能性。


多方式认证的整合

整体架构图

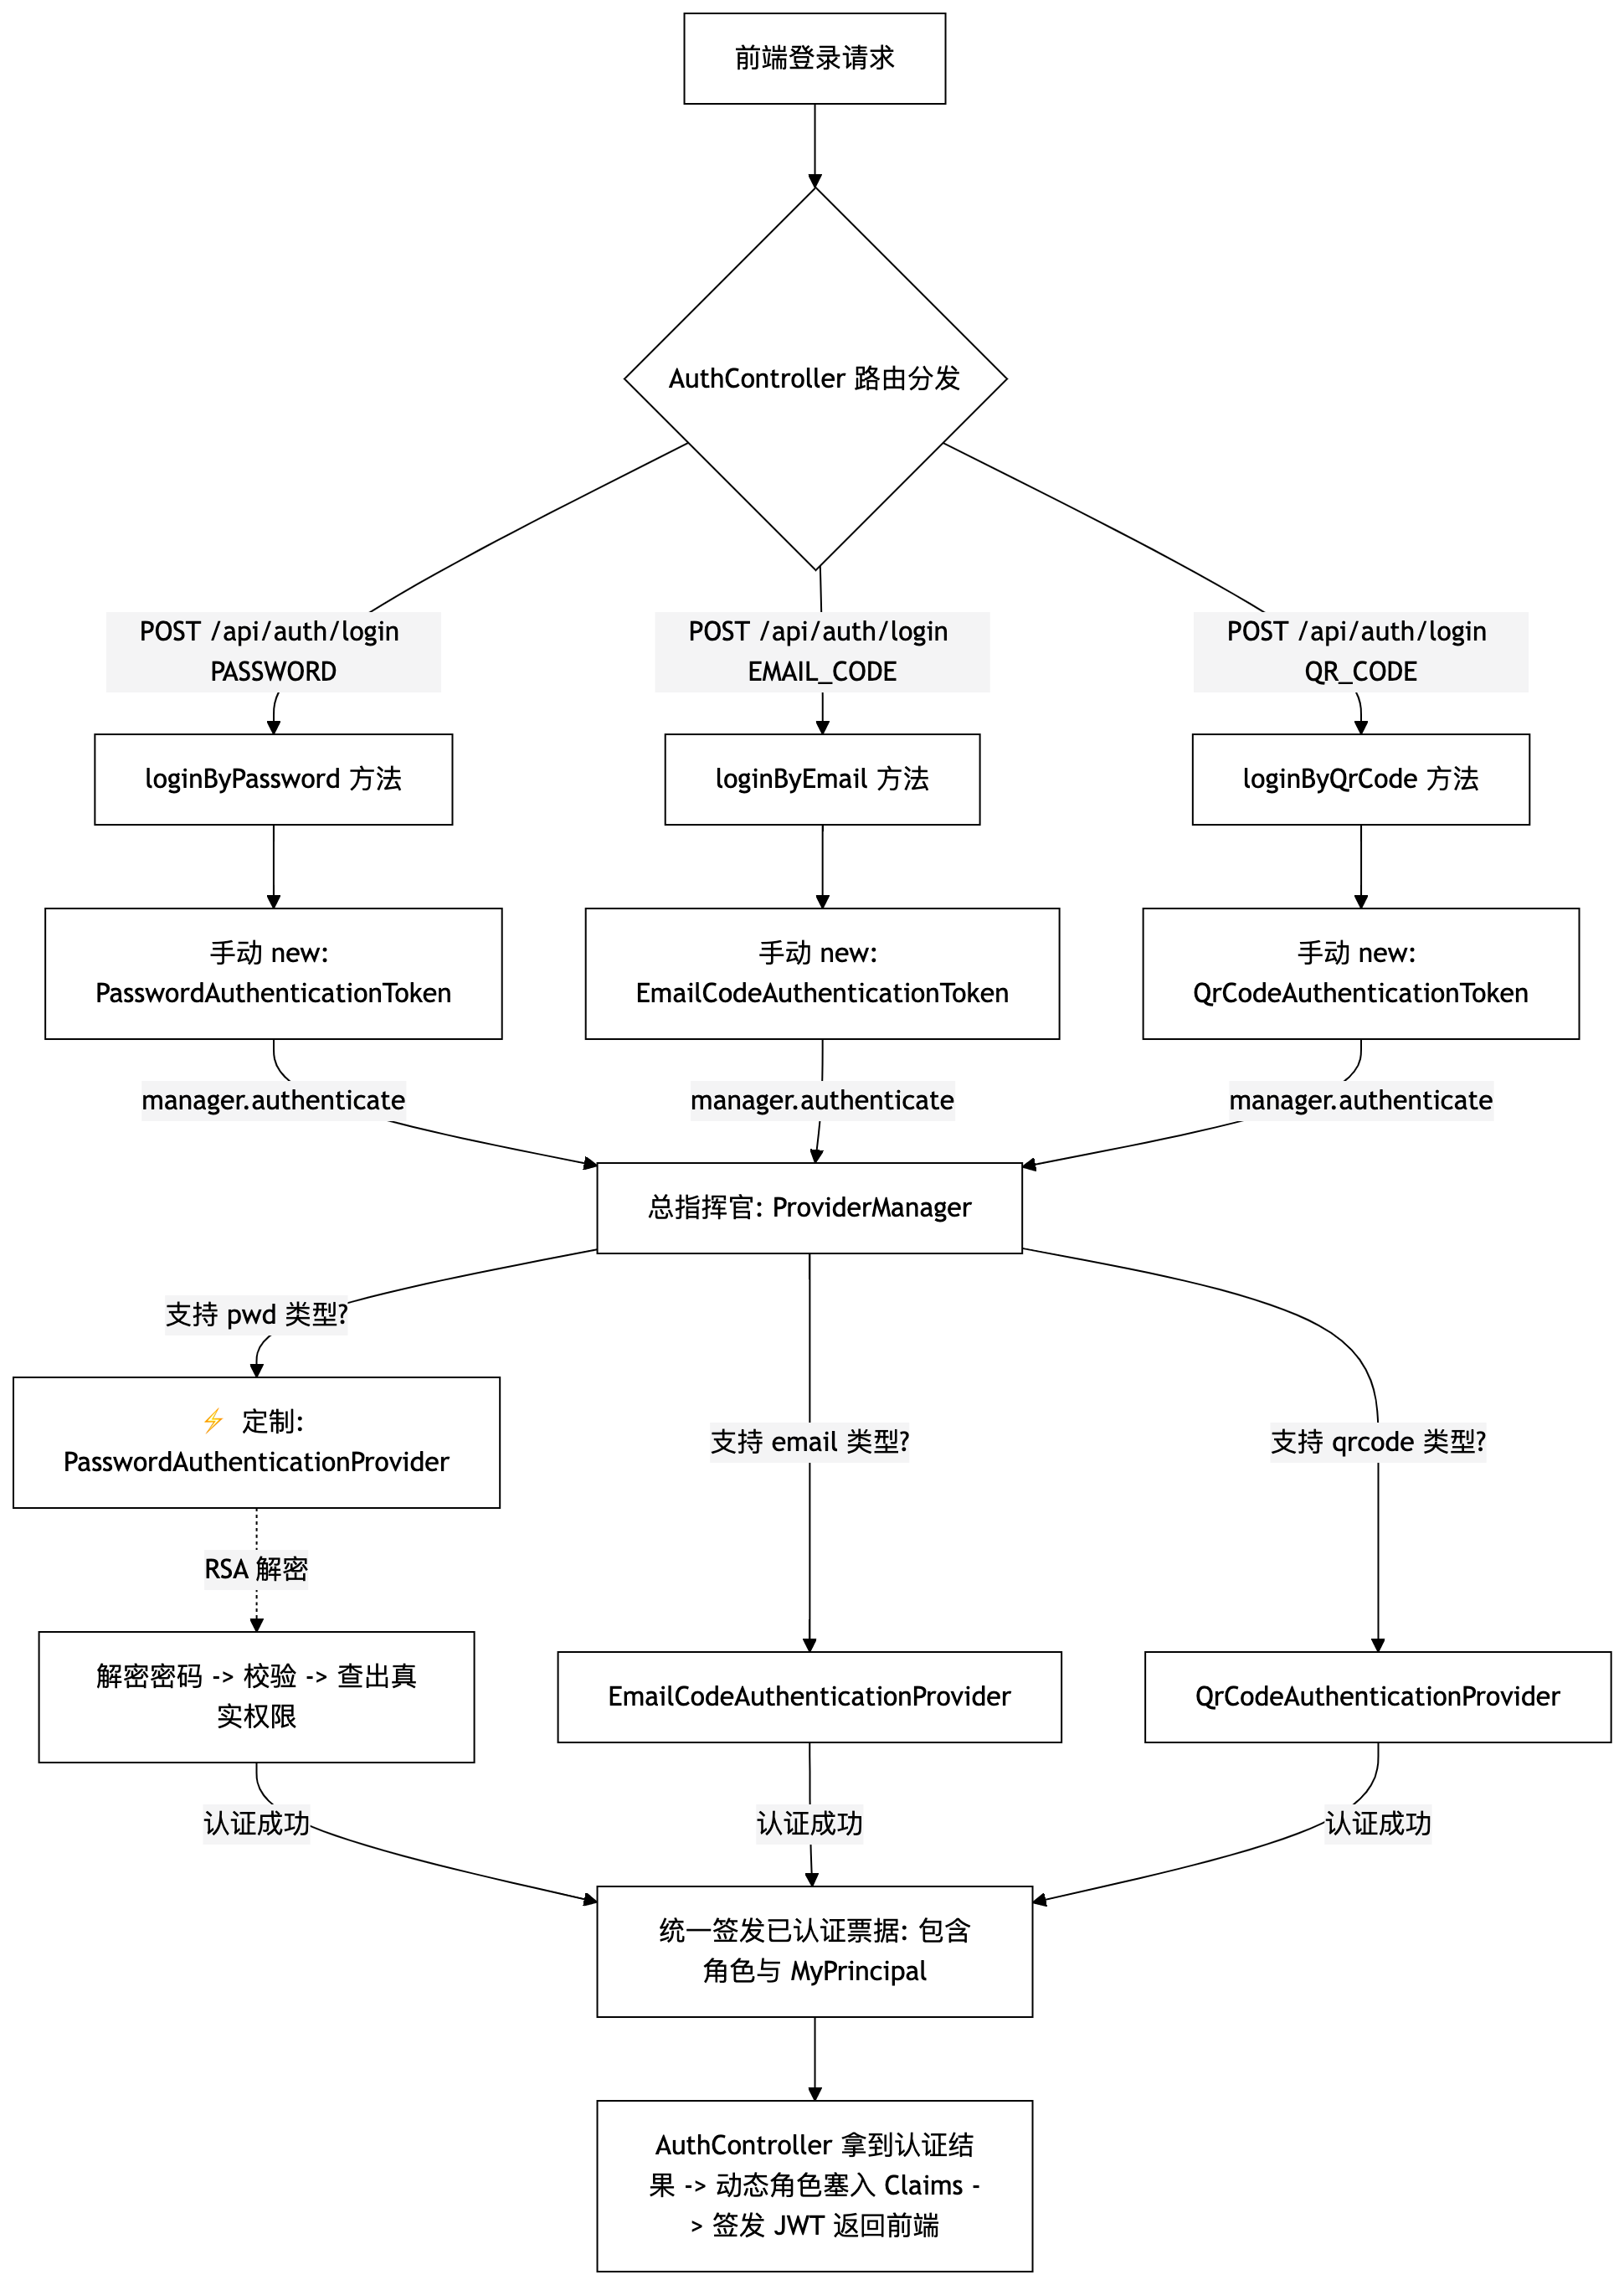
在实际的项目中,一个系统往往需要同时支持用户名密码、邮箱验证码、手机快捷登录、第三方授权(微信/GitHub)、扫码登录等多种认证方式。如果为每种登录方式都写一套独立的拦截器或控制器,代码很快就会变成一盘难以维护的散沙。一般组织多种认证方式的核心思想是:“解耦认证源,统一上下游”(尤其是基于 Spring Security 的企业级架构中)。

Spring Security 采用的是高度抽象的策略模式。它把整个认证链路拆解为了三个最核心的积木:

  • Authentication(认证凭证):一个纯粹的承载数据的 “无知” 对象(纸质表单)。
  • AuthenticationProvider(认证执行者):只负责判断某种特定的 Authentication 是否合法。
  • AuthenticationManager(认证统筹管理器):总指挥官。它手里牵着一堆 AuthenticationProvider,负责转发请求。

在生产中,不管用户用什么方式登录,最终都会统一汇聚到 ProviderManager,它是 AuthenticationManager 的实现类,由它进行分发。多种方式认证整体架构图:

具体代码实现

业务控制器

UnifiedAuthController

1
2
3
4
5
6
7
8
9
10
11
12
13
14
15
16
17
18
19
20
21
22
23
24
25
26
27
28
29
30
31
32
33
34
35
36
37
38
39
40
41
42
43
44
45
46
47
48
49
50
51
52
53
54
55
56
57
58
59
60
61
62
63
64
65
66
67
68
69
70
71
72
73
74
75
76
77
78
79
80
81
82
83
84
85
86
87
88
89
90
91
92
93
94
95
96
97
98
99
100
101
102
103
104
105
106
107
108
109
110
111
112
113
114
115
116
117
118
119
120
121
122
123
124
125
126
127
128
129
130
131
132
@RestController
@RequestMapping("/api/auth")
public class UnifiedAuthController {

@Resource
private AuthenticationManager authenticationManager; // 注入安全统筹总指挥

@Resource
private StringRedisTemplate stringRedisTemplate;

@Resource
private JavaMailSender javaMailSender;

@Value("${spring.mail.username}")
private String fromEmail;

/**
* 1.1 独立公共接口:发送邮箱验证码或手机验证码(预登录)
*/
@GetMapping("/pre-login-for-email_auth")
public ResponseEntity<?> sendCode(@RequestParam String email) {
if (email == null || !email.contains("@")) {
return ResponseEntity.status(HttpStatus.BAD_REQUEST).body("请输入有效的邮箱地址");
}
String lockKey = EmailCodeAuthenticationProvider.REDIS_SEND_LOCK_PREFIX + email;
if (Boolean.TRUE.equals(stringRedisTemplate.hasKey(lockKey))) {
return ResponseEntity.status(HttpStatus.TOO_MANY_REQUESTS).body("发送太频繁,请60秒后再试");
}

try {
String emailCode = String.valueOf((int) ((Math.random() * 9 + 1) * 100000));
stringRedisTemplate.opsForValue().set(EmailCodeAuthenticationProvider.REDIS_EMAIL_CODE_PREFIX + email, emailCode, 5, TimeUnit.MINUTES);
stringRedisTemplate.opsForValue().set(lockKey, "lock", 60, TimeUnit.SECONDS);

SimpleMailMessage message = new SimpleMailMessage();
message.setFrom(fromEmail);
message.setTo(email);
message.setSubject("【Owlias】快捷登录验证码");
message.setText("您的快捷登录验证码为:" + emailCode + ",5分钟内有效。若非本人操作请忽略。");
javaMailSender.send(message);

return ResponseEntity.ok("验证码已成功发送至邮箱");
} catch (Exception e) {
return ResponseEntity.status(HttpStatus.INTERNAL_SERVER_ERROR).body("验证码发送失败");
}
}

/**
* 1.2 用户名密码认证:预登录接口(生成公钥、验证码)
*/
@GetMapping("/pre-login-for-username_password_auth")
public ResponseEntity<?> preLogin() {
try {
String qpKey = UUID.randomUUID().toString().replaceAll("-", "");
LineCaptcha captcha = CaptchaUtil.createLineCaptcha(200, 100, 4, 20);
Map<String, String> keyPair = RsaUtil.generateKeyPair();

stringRedisTemplate.opsForValue().set(PasswordAuthenticationProvider.REDIS_CAPTCHA_PREFIX + qpKey, captcha.getCode().toLowerCase(), 3, TimeUnit.MINUTES);
stringRedisTemplate.opsForValue().set(PasswordAuthenticationProvider.REDIS_RSA_PRIVATE_PREFIX + qpKey, keyPair.get("privateKey"), 3, TimeUnit.MINUTES);

Map<String, Object> responseData = new HashMap<>();
responseData.put("qpKey", qpKey);
responseData.put("publicKey", keyPair.get("publicKey"));
responseData.put("captchaImage", captcha.getImageBase64Data());

return ResponseEntity.ok(responseData);
} catch (Exception e) {
return ResponseEntity.status(HttpStatus.INTERNAL_SERVER_ERROR).body("凭证生成失败");
}
}

/**
* 2. 聚合登录大一统接口
*/
@PostMapping("/login")
public ResponseEntity<?> login(@RequestBody LoginDTO loginDTO) {
Authentication authenticationInput;

// 根据前端传来的策略标记,封装成不同的空白表单Token
if ("EMAIL_CODE".equalsIgnoreCase(loginDTO.getLoginType())) {
authenticationInput = new EmailCodeAuthenticationToken(loginDTO.getEmail(), loginDTO.getCode());
} else if ("PASSWORD".equalsIgnoreCase(loginDTO.getLoginType())) {
authenticationInput = new PasswordAuthenticationToken(loginDTO.getUsername(), loginDTO.getEncryptedPassword(), loginDTO.getCaptchaCode(), loginDTO.getQpKey());
} else {
return ResponseEntity.status(HttpStatus.BAD_REQUEST).body("不支持的登录类型");
}

try {
// 总指挥官根据内部支持的 Provider 列表,自动挑选对应的审查官进行认证
Authentication authenticationResult = authenticationManager.authenticate(authenticationInput);

// 认证通过,下游统一处理:签发 JWT Token 令牌
MyPrincipal principal = (MyPrincipal) authenticationResult.getPrincipal();
String accessToken = JwtUtil.generateToken(principal.getUid().toString(), principal.getUname()); // 此处语义根据系统JwtUtil定义保持一致

Map<String, Object> successData = new HashMap<>();
successData.put("token", accessToken);
successData.put("tokenType", "Bearer");
successData.put("username", principal.getUname());
successData.put("msg", "登录成功");

return ResponseEntity.ok(successData);
} catch (Exception e) {
return ResponseEntity.status(HttpStatus.UNAUTHORIZED).body("认证失败:" + e.getMessage());
}
}


@Resource
private PasswordEncoder passwordEncoder;
@Resource
private UserRepository userRepository;

/**
* 3. 用户注册接口。演示如何在数据落库前,使用 BCrypt 自动加盐加密
*/
@PostMapping("/register")
public ResponseEntity<?> register(@RequestParam String username, @RequestParam String password) {
// 检查用户名是否已存在
if (userRepository.findByUsername(username).isPresent()) {
return ResponseEntity.status(HttpStatus.BAD_REQUEST).body("用户名已被占用");
}

// 使用 BCrypt 加密明文密码,得到合法的 60 位密文(内部自带随机盐)
String encodedPassword = passwordEncoder.encode(password);

// 构造实体并持久化
UserEntity newUser = new UserEntity(null, username, encodedPassword);
userRepository.save(newUser);
return ResponseEntity.ok("注册成功");
}
}

OrderController:用于测试登陆之后的请求

1
2
3
4
5
6
7
8
9
10
11
@RestController
@RequestMapping("/api/order")
public class OrderController {

@GetMapping("/getOrderById")
public ResponseEntity<?> getOrderById(@RequestParam Long orderId) {
Object principal = SecurityContextHolder.getContext().getAuthentication().getPrincipal();
System.out.println(principal); // 我们放入 principal 的是一个 map
return ResponseEntity.ok(Map.of("orderId", 1L, "createTime", new Date()));
}
}

LoginDTO

1
2
3
4
5
6
7
8
9
10
11
12
13
14
15
@Data
public class LoginDTO {
// 登录类型标识: "PASSWORD" 或 "EMAIL_CODE"
private String loginType;

// 邮箱登录参数
private String email;
private String code;

// 用户名密码登录参数
private String username; // 用户名
private String encryptedPassword; // 公钥加密后的密码
private String captchaCode; // 图片验证码
private String qpKey; // 快捷公钥的key
}


Authentication

EmailCodeAuthenticationToken

1
2
3
4
5
6
7
8
9
10
11
12
13
14
15
16
17
18
19
20
21
22
23
24
25
26
27
28
29
30
31
32
33
34
35
36
37
38
39
40
41
import org.springframework.security.authentication.AbstractAuthenticationToken;
import org.springframework.security.core.GrantedAuthority;
import java.util.Collection;

/**
* 自定义邮箱验证码认证令牌
*/
public class EmailCodeAuthenticationToken extends AbstractAuthenticationToken {
private final Object principal; // 存放邮箱账号
private Object credentials; // 存放验证码

/**
* 构建认证前的 Token (未激活)
*/
public EmailCodeAuthenticationToken(Object principal, Object credentials) {
super(null);
this.principal = principal;
this.credentials = credentials;
setAuthenticated(false);
}

/**
* 构建认证成功后的 Token (已激活)
*/
public EmailCodeAuthenticationToken(Object principal, Object credentials, Collection<? extends GrantedAuthority> authorities) {
super(authorities);
this.principal = principal;
this.credentials = credentials;
super.setAuthenticated(true);
}

@Override
public Object getCredentials() {
return this.credentials;
}

@Override
public Object getPrincipal() {
return this.principal;
}
}

EmailCodeAuthenticationProvider

1
2
3
4
5
6
7
8
9
10
11
12
13
14
15
16
17
18
19
20
21
22
23
24
25
26
27
28
29
30
31
32
33
34
35
36
37
38
39
40
41
42
43
44
45
46
47
48
49
50
51
52
53
54
55
56
57
58
59
60
61
62
63
64
import jakarta.annotation.Resource;
import org.springframework.data.redis.core.StringRedisTemplate;
import org.springframework.security.authentication.AuthenticationProvider;
import org.springframework.security.authentication.BadCredentialsException;
import org.springframework.security.core.Authentication;
import org.springframework.security.core.AuthenticationException;
import org.springframework.security.core.authority.SimpleGrantedAuthority;
import org.springframework.stereotype.Component;
import zdemo01.auth.MyPrincipal;
import zdemo01.model.entity.UserEntity;
import zdemo01.repository.UserRepository;
import java.util.List;
import java.util.UUID;

@Component
public class EmailCodeAuthenticationProvider implements AuthenticationProvider {

@Resource
private StringRedisTemplate stringRedisTemplate;
@Resource
private UserRepository userRepository;

public static final String REDIS_EMAIL_CODE_PREFIX = "auth:email:code:";
public static final String REDIS_SEND_LOCK_PREFIX = "auth:email:lock:";

@Override
public Authentication authenticate(Authentication authentication) throws AuthenticationException {
EmailCodeAuthenticationToken authenticationToken = (EmailCodeAuthenticationToken) authentication;
String email = (String) authenticationToken.getPrincipal();
String code = (String) authenticationToken.getCredentials();

// 1. 核心校验:比对 Redis
String redisKey = REDIS_EMAIL_CODE_PREFIX + email;
String cachedCode = stringRedisTemplate.opsForValue().get(redisKey);
if (cachedCode == null || !cachedCode.equals(code)) {
throw new BadCredentialsException("验证码错误或已过期");
}

// 2. 阅后即焚
stringRedisTemplate.delete(redisKey);
stringRedisTemplate.delete(REDIS_SEND_LOCK_PREFIX + email);

// 3. 免密精髓:自动注册/查库
UserEntity user = userRepository.findByUsername(email)
.orElseGet(() -> {
String randomPasswordPlaceholder = UUID.randomUUID().toString().replaceAll("-", "");
// 注意:此处如果需要对占位符密码进行加密处理,可另行注入 PasswordEncoder,但由于不走密码登录,直接存亦可。
UserEntity newUser = new UserEntity(null, email, randomPasswordPlaceholder);
return userRepository.save(newUser);
});

// 4. ⚡ 赋予基础权限,激活认证状态
List<SimpleGrantedAuthority> authorities = List.of(new SimpleGrantedAuthority("ROLE_USER"));
return new EmailCodeAuthenticationToken(new MyPrincipal(user.getId(), user.getUsername()), null, authorities);
}

/**
* 统筹官靠这个方法来决定把票分给谁
*/
@Override
public boolean supports(Class<?> authentication) {
return EmailCodeAuthenticationToken.class.isAssignableFrom(authentication);
}
}

PasswordAuthenticationToken

1
2
3
4
5
6
7
8
9
10
11
12
13
14
15
16
17
18
19
20
21
22
23
24
25
26
27
28
29
30
31
32
33
34
35
36
37
38
39
40
41
42
43
44
45
46
47
public class PasswordAuthenticationToken extends AbstractAuthenticationToken {

private final Object principal; // 存放用户名
private Object credentials; // 存放前端传过来公钥加密后的密码
private String captchaCode; // 存放图片验证码
private String qpKey; // 存放 qpKey

/**
* 构建认证前的 Token (未激活)
*/
public PasswordAuthenticationToken(Object principal, Object credentials, String captchaCode, String qpKey) {
super(null);
this.principal = principal;
this.credentials = credentials;
this.captchaCode = captchaCode;
this.qpKey = qpKey;
super.setAuthenticated(false);
}

/**
* 构建认证成功后的 Token (已激活)
*/
public PasswordAuthenticationToken(Object principal, Object credentials, Collection<? extends GrantedAuthority> authorities) {
super(authorities);
this.principal = principal;
this.credentials = credentials;
super.setAuthenticated(true);
}

@Override
public Object getCredentials() {
return this.credentials;
}

@Override
public Object getPrincipal() {
return this.principal;
}

public String getCaptchaCode() {
return this.captchaCode;
}

public String getQpKey() {
return this.qpKey;
}
}

PasswordAuthenticationProvider

1
2
3
4
5
6
7
8
9
10
11
12
13
14
15
16
17
18
19
20
21
22
23
24
25
26
27
28
29
30
31
32
33
34
35
36
37
38
39
40
41
42
43
44
45
46
47
48
49
50
51
52
53
54
55
56
57
58
59
60
61
62
63
64
65
66
67
68
69
70
71
72
73
74
75
76
77
78
79
@Component
public class PasswordAuthenticationProvider implements AuthenticationProvider {

@Resource
private UserRepository userRepository;
@Resource
private PasswordEncoder passwordEncoder;
@Resource
private StringRedisTemplate stringRedisTemplate;

public static final String REDIS_CAPTCHA_PREFIX = "auth:captcha:";
public static final String REDIS_RSA_PRIVATE_PREFIX = "auth:rsa:private:";
public static final String REDIS_FAIL_COUNT_PREFIX = "auth:fail:count:";

@Override
public Authentication authenticate(Authentication authentication) throws AuthenticationException {
PasswordAuthenticationToken authenticationToken = (PasswordAuthenticationToken) authentication;
String username = (String) authenticationToken.getPrincipal();
String encryptedPassword = (String) authenticationToken.getCredentials();
String captchaCode = authenticationToken.getCaptchaCode();
String qpKey = authenticationToken.getQpKey();

// 1. 限流防爆破
String failCountKey = REDIS_FAIL_COUNT_PREFIX + username;
String failCountStr = stringRedisTemplate.opsForValue().get(failCountKey);
if (failCountStr != null && Integer.parseInt(failCountStr) >= 5) {
throw new LockedException("错误次数过多,请15分钟后再试");
}

// 2. 校验图形验证码
String cachedCaptcha = stringRedisTemplate.opsForValue().get(REDIS_CAPTCHA_PREFIX + qpKey);
if (cachedCaptcha == null || !cachedCaptcha.equals(captchaCode.toLowerCase())) {
throw new NonceExpiredException("验证码错误或已过期");
}

// 3. 提取私钥解密密码
String privateKeyKey = REDIS_RSA_PRIVATE_PREFIX + qpKey;
String privateKey = stringRedisTemplate.opsForValue().get(privateKeyKey);
if (privateKey == null) {
throw new NonceExpiredException("安全凭证已失效");
}

String rawPassword;
try {
rawPassword = RsaUtil.decrypt(encryptedPassword, privateKey);
} catch (Exception e) {
throw new BadCredentialsException("数据解析失败");
} finally {
stringRedisTemplate.delete(privateKeyKey);
stringRedisTemplate.delete(REDIS_CAPTCHA_PREFIX + qpKey);
}

// 从库中捞出用户信息
Optional<UserEntity> userOpt = userRepository.findByUsername(username);
// BCrypt 比对(直接用从 DB 查出来的密文进行 matches)
if (userOpt.isEmpty() || !passwordEncoder.matches(rawPassword, userOpt.get().getPassword())) {
Long currentFailCount = stringRedisTemplate.opsForValue().increment(failCountKey);
if (currentFailCount != null && currentFailCount == 1) {
stringRedisTemplate.expire(failCountKey, 15, TimeUnit.MINUTES);
}
throw new BadCredentialsException("用户名或密码错误");
}
// 阅后即焚
stringRedisTemplate.delete(failCountKey);

// ⚡ 赋予基础权限,激活认证状态(这里不再下发token,改到统一登录的地方下发)
UserEntity user = userOpt.get();
List<SimpleGrantedAuthority> authorities = List.of(new SimpleGrantedAuthority("ROLE_USER"));
return new PasswordAuthenticationToken(new MyPrincipal(user.getId(), user.getUsername()), null, authorities);
}

/**
* 声明我只支持标准的 PasswordAuthenticationToken 票据
*/
@Override
public boolean supports(Class<?> authentication) {
return PasswordAuthenticationToken.class.isAssignableFrom(authentication);
}
}


SecurityConfig

1
2
3
4
5
6
7
8
9
10
11
12
13
14
15
16
17
18
19
20
21
22
23
24
25
26
27
28
29
30
31
32
33
34
35
36
37
38
39
40
41
42
43
44
45
46
47
48
49
50
51
52
import org.springframework.context.annotation.Bean;
import org.springframework.context.annotation.Configuration;
import org.springframework.security.authentication.AuthenticationManager;
import org.springframework.security.authentication.ProviderManager;
import org.springframework.security.config.annotation.web.builders.HttpSecurity;
import org.springframework.security.config.annotation.web.configurers.AbstractHttpConfigurer;
import org.springframework.security.config.http.SessionCreationPolicy;
import org.springframework.security.crypto.bcrypt.BCryptPasswordEncoder;
import org.springframework.security.crypto.password.PasswordEncoder;
import org.springframework.security.web.SecurityFilterChain;
import org.springframework.security.web.authentication.UsernamePasswordAuthenticationFilter;
import zdemo01.auth.sms.EmailCodeAuthenticationProvider;
import zdemo01.auth.userpass.PasswordAuthenticationProvider;
import zdemo01.filter.JwtAuthenticationFilter;
import java.util.List;

@Configuration
public class SecurityConfig {

@Bean
public PasswordEncoder passwordEncoder() {
return new BCryptPasswordEncoder();
}

/**
* 核心统筹官:告别内置 DaoProvider,换上我们亲生的两个纯手工 Provider
*/
@Bean
public AuthenticationManager authenticationManager(
PasswordAuthenticationProvider passwordAuthenticationProvider,
EmailCodeAuthenticationProvider emailCodeAuthenticationProvider) {
// 直接让总指挥官管理我们两个量身定制的审查官
return new ProviderManager(List.of(passwordAuthenticationProvider, emailCodeAuthenticationProvider));
}

/**
* 核心安全链配置
*/
@Bean
public SecurityFilterChain securityFilterChain(HttpSecurity http, JwtAuthenticationFilter jwtAuthenticationFilter) throws Exception {
http.csrf(AbstractHttpConfigurer::disable)
.cors(cors -> cors.configure(http))
.sessionManagement(session -> session.sessionCreationPolicy(SessionCreationPolicy.STATELESS))
.authorizeHttpRequests(auth -> auth
.requestMatchers("/api/auth/**").permitAll() // 统一放行登录及发送验证码接口
.anyRequest().authenticated()
)
// 在密码验证过滤器之前,优先进行外部 JWT Token 拦截处理
.addFilterBefore(jwtAuthenticationFilter, UsernamePasswordAuthenticationFilter.class);
return http.build();
}
}


统一的过滤器

1
2
3
4
5
6
7
8
9
10
11
12
13
14
15
16
17
18
19
20
21
22
23
24
25
26
27
28
29
30
31
32
33
34
35
36
37
38
39
40
41
42
43
44
45
46
47
48
49
50
51
52
import io.jsonwebtoken.Claims;
import jakarta.servlet.FilterChain;
import jakarta.servlet.ServletException;
import jakarta.servlet.http.HttpServletRequest;
import jakarta.servlet.http.HttpServletResponse;
import org.springframework.security.authentication.UsernamePasswordAuthenticationToken;
import org.springframework.security.core.authority.SimpleGrantedAuthority;
import org.springframework.security.core.context.SecurityContextHolder;
import org.springframework.stereotype.Component;
import org.springframework.web.filter.OncePerRequestFilter;
import zdemo01.auth.MyPrincipal;
import zdemo01.utils.JwtUtil;
import java.io.IOException;
import java.util.List;

@Component
public class JwtAuthenticationFilter extends OncePerRequestFilter {

@Override
protected void doFilterInternal(HttpServletRequest request, HttpServletResponse response, FilterChain filterChain)
throws ServletException, IOException {

// 放过浏览器预检请求,避免跨域 403
if ("OPTIONS".equalsIgnoreCase(request.getMethod())) {
filterChain.doFilter(request, response);
return;
}

String header = request.getHeader("Authorization");
if (header != null && header.startsWith("Bearer ")) {
String token = header.substring(7);
try {
Claims claims = JwtUtil.parseToken(token);
Object idObj = claims.get("userId");
Long userId = idObj instanceof Number ? ((Number) idObj).longValue() : Long.parseLong(idObj.toString());
String username = claims.get("username", String.class);
if (username != null) {
// 这里虽然用的是标准 UsernamePasswordAuthenticationToken,但它的 Principal 已经是我们的自定义对象了
MyPrincipal principal = new MyPrincipal(userId, username);
List<SimpleGrantedAuthority> authorities = List.of(new SimpleGrantedAuthority("ROLE_USER")); // 这里可以动态授权
UsernamePasswordAuthenticationToken auth = new UsernamePasswordAuthenticationToken(principal, null, authorities);
SecurityContextHolder.getContext().setAuthentication(auth);
}
} catch (Exception e) {
// Token 过期/篡改,清空上下文
SecurityContextHolder.clearContext();
}
}
// 无论是否带 Token,都放行给后面的逻辑(没认证后面 .authenticated() 自然会拦截)
filterChain.doFilter(request, response);
}
}